
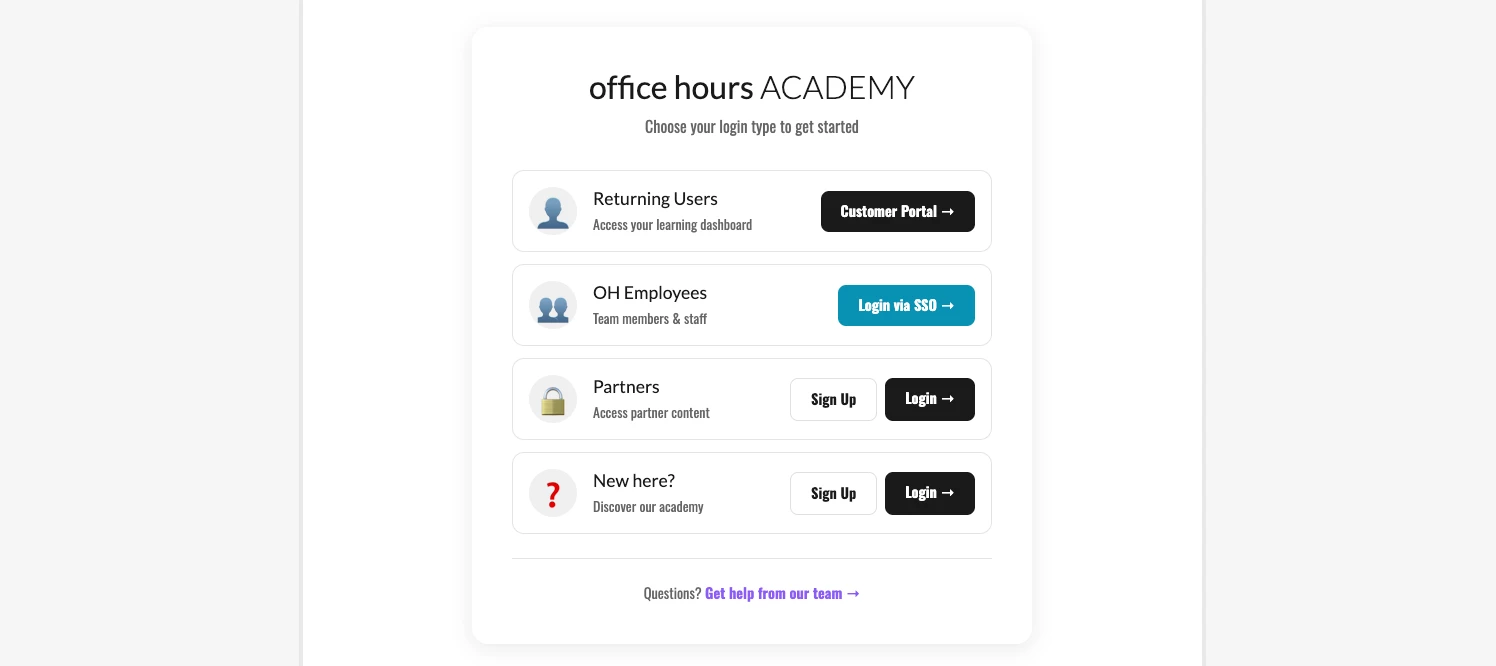
When to Use & Primary Value
When to Use: When you support multiple user types (customers, employees, partners, learners) and need to route users to different login or registration paths.
Primary Value: Reduces confusion by helping users immediately identify the correct path and next step.
What You Need
- Thought Industries admin access (Manager/Admin)
- Access to:
- Settings → Connections → Tracking Scripts
- Site Builder → Custom Code → CSS
- Your destination URLs ready (SSO + sign-up)
Important Placeholders to Replace
In the code you’ll see placeholders like:
[INSERT_SSO_URL]→ replace with your actual SSO URL/learn/sign_up→ replace if your sign-up path differs- Brand text (“Your Academy”) → replace with your brand
- Brand colors (#0891B2) → replace with your brand
Important note about the native form selector
These guides assume the native sign-in form selector is:
$('form.session__form')
If you suspect your theme uses a different selector, inspect the sign-in page HTML and update the selector in the Footer script.
Hidden Elements to know about
$form.hide();
- What it hides: The native sign-in form (
$('form.session__form')). - When: It hides the native form when the page loads, allowing the custom multi-path card layout to be displayed instead.
$('.ti-opt1').hide();
- What it hides: The custom multi-path card layout (
< div class="ti-opt1">). - When: It is called within the click handler for buttons with the class
.ti-showform(e.g., the "Login →" buttons for Partners and New here?), which hides the custom layout and then shows the native sign-in form ($form.show();).
Where to Paste Things
1) Header Scripts
Settings → Connections → Tracking Scripts → Header Scripts
2) Footer Scripts
Settings → Connections → Tracking Scripts → Footer Scripts
3) CSS
Site Builder → Custom Code → CSS
Don’t forget to save after you paste code into these areas!
Steps
Step 1: Add jQuery (Header Scripts)
Paste into header scripts:
<!-- jQuery Library - Required for custom sign-in UI -->
<script src="https://cdnjs.cloudflare.com/ajax/libs/jquery/3.4.1/jquery.min.js" integrity="sha256-CSXorXvZcTkaix6Yvo6HppcZGetbYMGWSFlBw8HfCJo=" crossorigin="anonymous"></script>
Step 2: Add jQuery (Footer Scripts)
Paste into footer scripts:
<!-- Option 1: Multi-Path Cards -->
<script>
(function() {
  'use strict';

  function init() {
    if (typeof jQuery === 'undefined') { setTimeout(init, 50); return; }

    jQuery(function($) {
      if (!window.location.pathname.includes('/sign_in')) return;
      if ($('.ti-opt1').length) return;

      var $form = $('form.session__form');
      if (!$form.length) return;

      // Hide native form initially
      $form.hide();

      var html = `
        <div class="ti-opt1">
          <div class="ti-card">
            <div class="ti-head">
              <h1>Your <span>Academy</span></h1>
              <p>Choose your login type to get started</p>
            </div>

            <div class="ti-row">
              <div class="ti-ico">👤</div>
              <div class="ti-txt">
                <h3>Returning Users</h3>
                <p>Access your learning dashboard</p>
              </div>
              <a class="ti-btn ti-dark" href="[INSERT_SSO_URL]">Customer Portal →</a>
            </div>

            <div class="ti-row">
              <div class="ti-ico">👥</div>
              <div class="ti-txt">
                <h3>Employees</h3>
                <p>Login with company credentials</p>
              </div>
              <a class="ti-btn ti-blue" href="[INSERT_SSO_URL]">Login via SSO →</a>
            </div>

            <div class="ti-row">
              <div class="ti-ico">🔒</div>
              <div class="ti-txt">
                <h3>Partners</h3>
                <p>Access partner content</p>
              </div>
              <div class="ti-btngrp">
                <a class="ti-btn ti-light" href="/learn/sign_up">Sign Up</a>
                <a class="ti-btn ti-dark ti-showform" href="#">Login →</a>
              </div>
            </div>

            <div class="ti-row">
              <div class="ti-ico">❓</div>
              <div class="ti-txt">
                <h3>New here?</h3>
                <p>Create an account to get started</p>
              </div>
              <div class="ti-btngrp">
                <a class="ti-btn ti-light" href="/learn/sign_up">Sign Up</a>
                <a class="ti-btn ti-dark ti-showform" href="#">Login →</a>
              </div>
            </div>

            <div class="ti-foot">
              <p>Need help? <a href="/contact">Contact support →</a></p>
            </div>
          </div>
        </div>
      `;

      $form.before(html);

      $(document).on('click', '.ti-opt1 .ti-showform', function(e) {
        e.preventDefault();
        $('.ti-opt1').hide();
        $form.show();
      });
    });
  }

  init();
})();
</script>
Step 3: Add CSS
Paste into Custom Code:
/* Option 1: Multi-Path Cards */
.ti-opt1 { max-width: 600px; margin: 60px auto; padding: 20px; }
.ti-opt1 .ti-card { background: #fff; border-radius: 16px; padding: 40px; box-shadow: 0 4px 20px rgba(0,0,0,.1); }

.ti-opt1 .ti-head { text-align: center; margin-bottom: 28px; }
.ti-opt1 .ti-head h1 { margin: 0 0 8px; font-size: 2rem; color: #1a1a1a; }
.ti-opt1 .ti-head h1 span { font-weight: 300; }
.ti-opt1 .ti-head p { margin: 0; color: #666; }

.ti-opt1 .ti-row { display: flex; align-items: center; gap: 16px; padding: 16px; margin-bottom: 12px; border: 1px solid #e5e5e5; border-radius: 12px; transition: .2s; }
.ti-opt1 .ti-row:hover { background: #f9f9f9; border-color: #d5d5d5; transform: translateX(4px); }

.ti-opt1 .ti-ico { width: 48px; height: 48px; border-radius: 50%; background: #f0f0f0; display:flex; align-items:center; justify-content:center; font-size: 1.8rem; flex-shrink: 0; }
.ti-opt1 .ti-txt { flex: 1; }
.ti-opt1 .ti-txt h3 { margin: 0 0 4px; font-size: 1.05rem; color: #1a1a1a; }
.ti-opt1 .ti-txt p { margin: 0; font-size: .9rem; color: #666; }

.ti-opt1 .ti-btn { padding: 10px 18px; border-radius: 8px; text-decoration: none; font-weight: 600; font-size: .92rem; display: inline-block; white-space: nowrap; transition: .2s; }
.ti-opt1 .ti-dark { background: #1a1a1a; color: #fff; }
.ti-opt1 .ti-blue { background: #0891B2; color: #fff; }
.ti-opt1 .ti-light { background: #fff; color: #1a1a1a; border: 1.5px solid #e0e0e0; }

.ti-opt1 .ti-btngrp { display:flex; gap: 8px; }
.ti-opt1 .ti-foot { text-align:center; margin-top: 18px; padding-top: 18px; border-top: 1px solid #e5e5e5; }
.ti-opt1 .ti-foot p { margin:0; color:#666; }
.ti-opt1 .ti-foot a { color:#8B5CF6; font-weight:600; text-decoration:none; }

@media (max-width: 768px) {
  .ti-opt1 .ti-row { flex-direction: column; text-align: center; }
  .ti-opt1 .ti-btngrp { flex-direction: column; width: 100%; }
  .ti-opt1 .ti-btn { width: 100%; text-align: center; }
}

body { background: linear-gradient(135deg, #f5f0ff 0%, #fff5f5 100%); min-height: 100vh; }
Final Step: Save & Test
- Make sure you saved your Tracking Scripts and CSS.
- Open an incognito window.
- Visit:
https://[your-domain].thoughtindustries.com/learn/sign_in - Confirm:
- Buttons go to the right destinations
- Native sign-in form works
- Mobile layout stacks correctly
Testing your entire user sign in flow is so important! Please take these code blocks as a starting place and adjust as needed to fit your site and use case.