
Summary:
Would you like to use your dashboard or custom page to advertise upcoming courses, events or certifications? Or even a new self paced content item that you have just dropped? Using some HTML you can do just that via a floating pop up box.
Requirement Overview:
If all of these requirements fit your end goal, this may be the play for you.
-
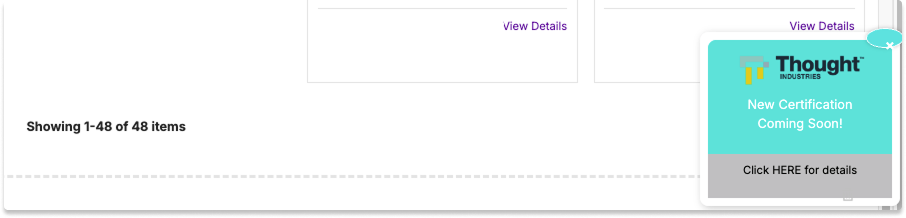
Requirement 1: Display a floating pop up box on a layout that can be configured to promote content
-
Requirement 2: Give the learner access to hide the box to get clear visibility of the dashboard (the pop up will appear each time the user lands on the page, but it can be dismissed each time)
Functional Areas to be Used:
- Dashboard
- HTML Widget
- Custom HTML
Core Functionality Configurations:
Description:
On a layout, add a new Custom HTML widget, then using the code provided, customize the image, text and colors to your own branding.
Basic understanding of HTML will be needed if you want to change the colors, add a hyperlink or change the dimensions of the pop up.
Configuration:
- From the left hand menu option choose Site, then Site Builder.
- Under Layouts, click on Set Up.
- Then under Dashboard Layout (or any layout/custom page), choose Edit.
- In the Widget list on the left, scroll to the bottom and choose the Custom HTML widget.
- In the HTML window that is displayed, enter the code in the below section.
- You can make changes to code in the HTML box and they will be reflected on the pop up box in real time.
- When complete click Save, then click View Live Page to ensure the pop up box displays as required.
Be aware that as soon as you click Save, the pop up box will be live on the dashboard.
Required Code:
<!DOCTYPE html>

<html>

<head> <meta name="viewport" content="width=device-width, initial-scale=1"> <style> body {font-family: Arial, Helvetica, sans-serif;}>


/* Design of the Callout Box */

.callout

{

display: inline-block;

position: fixed;

bottom: 30px; /* Keeps it visible when scrolling */

right: 20px;  /* Ensures it stays right-aligned */

max-width: 250px; /* Prevents it from being too large */

text-align: center;

border-radius: 20px; /* Gives a round edge  */

box-shadow: 12px 2px 20px rgba(0, 0, 0, 0.2);

background: blue;

padding: 5px; /* Thickness of the border  */

}


/* Design of the upper tile */

.callout-header

{

background: #6ae6e1; /* Color */ f

ont-size: 16px;

color: white; /* Text Color  */

padding: 10px;

border-top-left-radius: 10px;

border-top-right-radius: 10px;

}

.callout-header img {

max-width: 60%; /* Size of the image */

height: auto;

display: block;

margin: 0 auto 5px;

}


/* Design of the lower tile */

.callout-container {

background-color: #ccc; /* Color  */

color: black; /* Text Color  */

padding: 10px; font-size: 14px; }


/* Design of the Close button */

.closebtn {

position: absolute;

top: -10px;

right: -5px;

width: 25px;

height: 30px;

font-size: 20px;

color: white;

background: #6ae6e6;

border: 2px solid white;

border-radius: 50%;

cursor: pointer;

text-align:

center; line-height: 22px;

font-weight: bold;

z-index: 100;

box-shadow: 0px 0px 5px rgba(0, 0, 0, 0.2);

}


/* Mouse Hover over design */

.closebtn:hover {

background: white;

color: #911313;

border: 2px solid #6ae6e6;

}

</style>

</head>


<body>
<div class="callout">

<button class="closebtn" aria-label="Close" onclick="this.parentElement.style.display='none';">×</button>

<div class="callout-header">

<img src="https://uploads-eu-west-1.insided.com/thoughtindustries-en/attachment/df44a517-1d82-493b-ab80-e2a4ee93f772.png"> /* URL to image  */

<p>New Certification </br> Coming Soon!</p> /* Text in lower tile  */ </div>

<div class="callout-container"> <p>Click <a href="http://www.google.com">HERE</a> for details</p>  /* hyperlink to course  */ </div>
If the above code does not work as expected, you can copy the code from the attachment.
Risk and Mitigation Strategy:
- We suggest creating this box on your sandbox first (or test panorama) to ensure you have the size, colors and location correct before creating in your live instance.
- TI is not responsible for troubleshooting or maintaining or troubleshooting any HTML that is implemented on your instance.
- The pop up box will display each time the learner lands on the Dashboard, or any page the HTML widget exists.
We recommend setting a reminder to remove the widget after the intended purpose has been fulfilled.
Thank you to
