Do you have some users who log into your platform via username and password, while others need to log in via SSO? If that’s the case, when a SSO user lands on your TI Sign In page, it could be useful to have a link to guide them to their SSO IDP. Follow this guide to learn how.
Requirement Overview:
If any of these requirements fit your end goal, this may be the play for you.
Requirement 1: Require all your external learners to log in to TI via SSO and all internal learners to use a username and password (or vice versa)
Functional Areas to be Used:
Sign In Page
SSO
SSO Redirects
Tracking Scripts
Core Functionality Configurations:
Description:
Place a CTA button on the Sign In page to guide SSO users to click the button to be redirected to their Identity Provider.
Configuration:
Configure SSO between your chosen IDP and IT using THIS support article as a guideline.
Ensure that Account Logout URL is set to redirect to the main Sign In page.
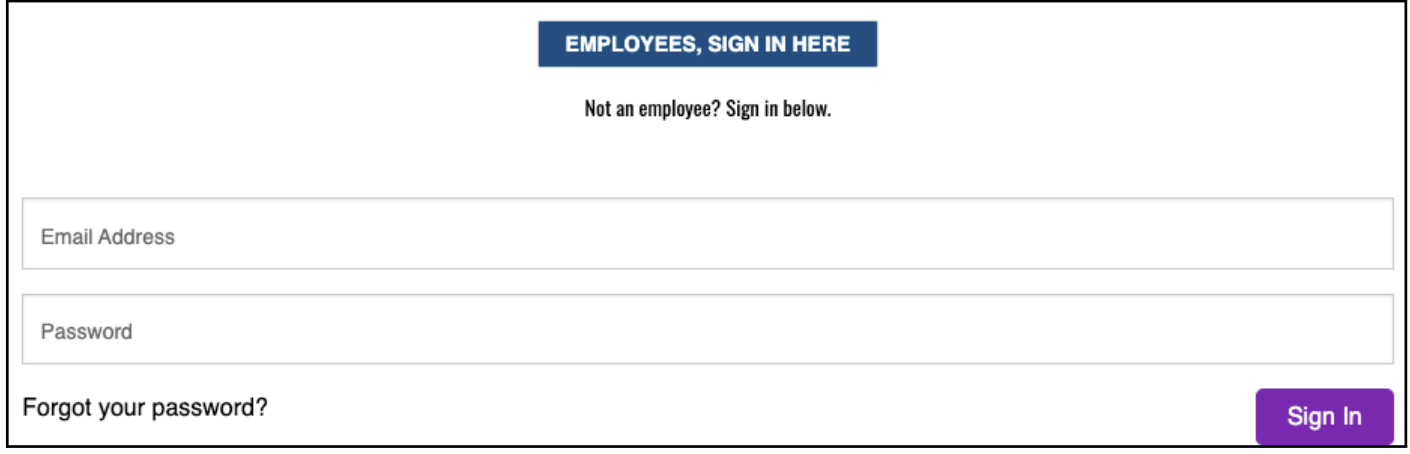
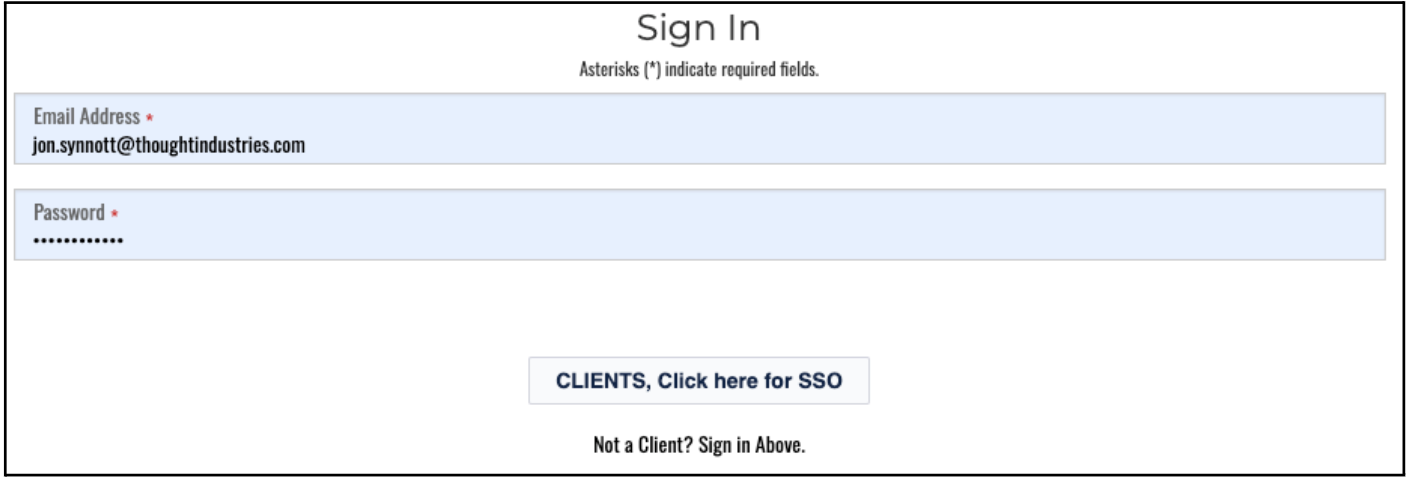
The SSO button can be configured to appear above or below the username/password object. See below an example of the SSO button appearing above: See below an example of the SSO button below username/password object:
Next, you’re going to add the script to provide a SSO button and text on the Sign In page to guide the appropriate learner to log in via SSO.
Navigate to Settings > Connections > Tracking Scripts.
Enter the following code into the Header script. This will set us up to add what we need to apply to the Footer script next. <script> <src="https://code.jquery.com/jquery-3.6.0.js" integrity="sha256-H+K7U5CnXl1h5ywQfKtSj8PCmoN9aaq30gDh27Xc0jk=" crossorigin="anonymous"></script>
Then in the Footer Script, add one of the following code options, depending on if you would like the SSO button to appear above or below the username/password. In the scripts, the text in green is where you enter your message on the button and provide instructions, the text in orange is the URL to the SSO IDP. Above <script> $("form$action='/learn/sign_in']" ).find("input(type='email']").before('<div style="margin-top:50px; margin-bottom:50px; font-size: 26px;text-align: center;color: #0A4C80;"><button type="button" style="background-color:#0a4c80"><b><a style="color:#fff;" href="WWW.SSO-URL.COM">EMPLOYEES, SIGN IN HERE</a></b></button><br><p style="font-size: 14px;text-align: center;color: #000;">Not an employee? Sign in below.</p> </div>'); </script> Below <script> $("form$action='/learn/sign_in']").find("input(type='password']").after('<div style="margin-bottom: 1.5rem; margin-top: 4rem; font-size: 12px;text-align: center;color: #888;"><a style="color: #124;"href="WWW.SSO-URL.COM" target="_blank" class="btn .btn__sso"><b>CLIENTS, Click here for SSO</b></a><br><p style="font-size: 14px;text-align: center;color: #000;">Not a Client? Sign in Above.</p> </div>'); </script>
Don’t forget to save!
Risk and Mitigation Strategy:
TI is not responsible for troubleshooting or maintaining any javascript that is implemented on your instance.
We recommend making it as clear as possible on the Sign In page the actions to be taken by both Employees and Clients. It could be confusing for the audience if they are not sure whether they are a Partner or Customer.
Learner could get caught in a loop if they try to log into the wrong SSO.
Additional information:
It is possible to add more than one button/CTA with a different IDP URL behind each button, e.g. if you have an SSO for Customers and an SSO for Partners.
To do this, add the following script in the Footer Text. <script> $("formtaction='/learn/sign_in']").find("h2").before('<h3>Sign In</h3> <div><div><a class="session__form-sso-dark" href="#INSERT EXTERNAL LOGIN URL for IDP 1]">Customer SSO Log-in</a></div> <div><a class="session__form-sso-light" href="#INSERT EXTERNAL LOGIN URL for IDP 2]">Partner SSO Log in SSO</a></div></>'); </script>
To add an SSO button to the Registration screen use the following page declaration window.location.pathname === '/register'
These CSS Blocks are designed for a default Thought Industries instance with no existing Custom Code, so any customizations you’ve added may generate conflicts.
Page 1 / 1
This is great, and exactly what my team wants to do!
We also want the SSO button to appear on the Registration page (/register). That page doesn’t have a similar form in the HTML so
$("formfaction='/register']")
doesn’t work as expected. Is there another suggested way to have the tracking script look for this page?
I was able to get it with window.location.pathname === '/register'
Hi @taylorschmidt
I am delighte that this worked for you and thank you for letting me know that you worked it out for the registration page. I will add your code into the Article above for others to use also.